Showing posts with label quiet book. Show all posts

Wednesday, June 14, 2017

Where's Max Quiet Book

This is not my pattern.  I purchased it off Etsy to make as a baby gift.  Oh my WORD it is cute!
Best part was I didn't need to purchase anything to make this as my hoarding, crafty self had everything in my stash of fabric and craft stuff :)  I LOVE gifts that only cost me time and look so fabulous!

the cover


all the animals are attached with elastic so they can stretch out of their homes


Max is attached with ribbon so he can't get lost :)


Isn't it just precious?  I love how the designer has a mix of fabric and felt.  Really brings so much texture and color to the book!

Wednesday, May 13, 2015

5 Pigs So Squeaky Clean Quiet Book Page


I LOVE this flannel board story and decided it would make a super fun quiet book page!  My youngest son and I will often lay in bed at night and sing songs together and he is quite fond of "the pig song".

Here is my interpretation:

On the left side is the bathtub (full of pigs) with vinyl and sequin bubbles to count.
On the right side is the pig pen with muddy pockets for the pigs to squish around in.


The pigs are clean on one side and dirty (with brown acrylic paint) on the other.


After the pigs get dirty, they can be soaped off in the tub and turn around to the clean side again!

I am hoping to have the pattern for this page up very soon!  Keep checking back!

Tuesday, April 28, 2015

Rocket and UFO Space Pages


I revamped my space page a little bit to make it bigger and add a rocket ship, astronaut, and stars to count to the basic UFO/alien page.  I really love how it turned out!  These are actually the second batch of aliens I made because my three year old absconded with the first set :)


I finished the pages in black satin with a star overlay.  Such a simple but super fun space set!

Itsy Bitsy Spider & Miss Muffet Quiet Book Pages

So I recently finished a Little Miss Muffet & the Itsy Bitsy Spider 2 page spread.  I am really happy with how it turned out!


 I finished the pages in this sweet butterfly and flower print I have left over from my wedding!  It just goes perfectly with the theme.


Monday, March 10, 2014

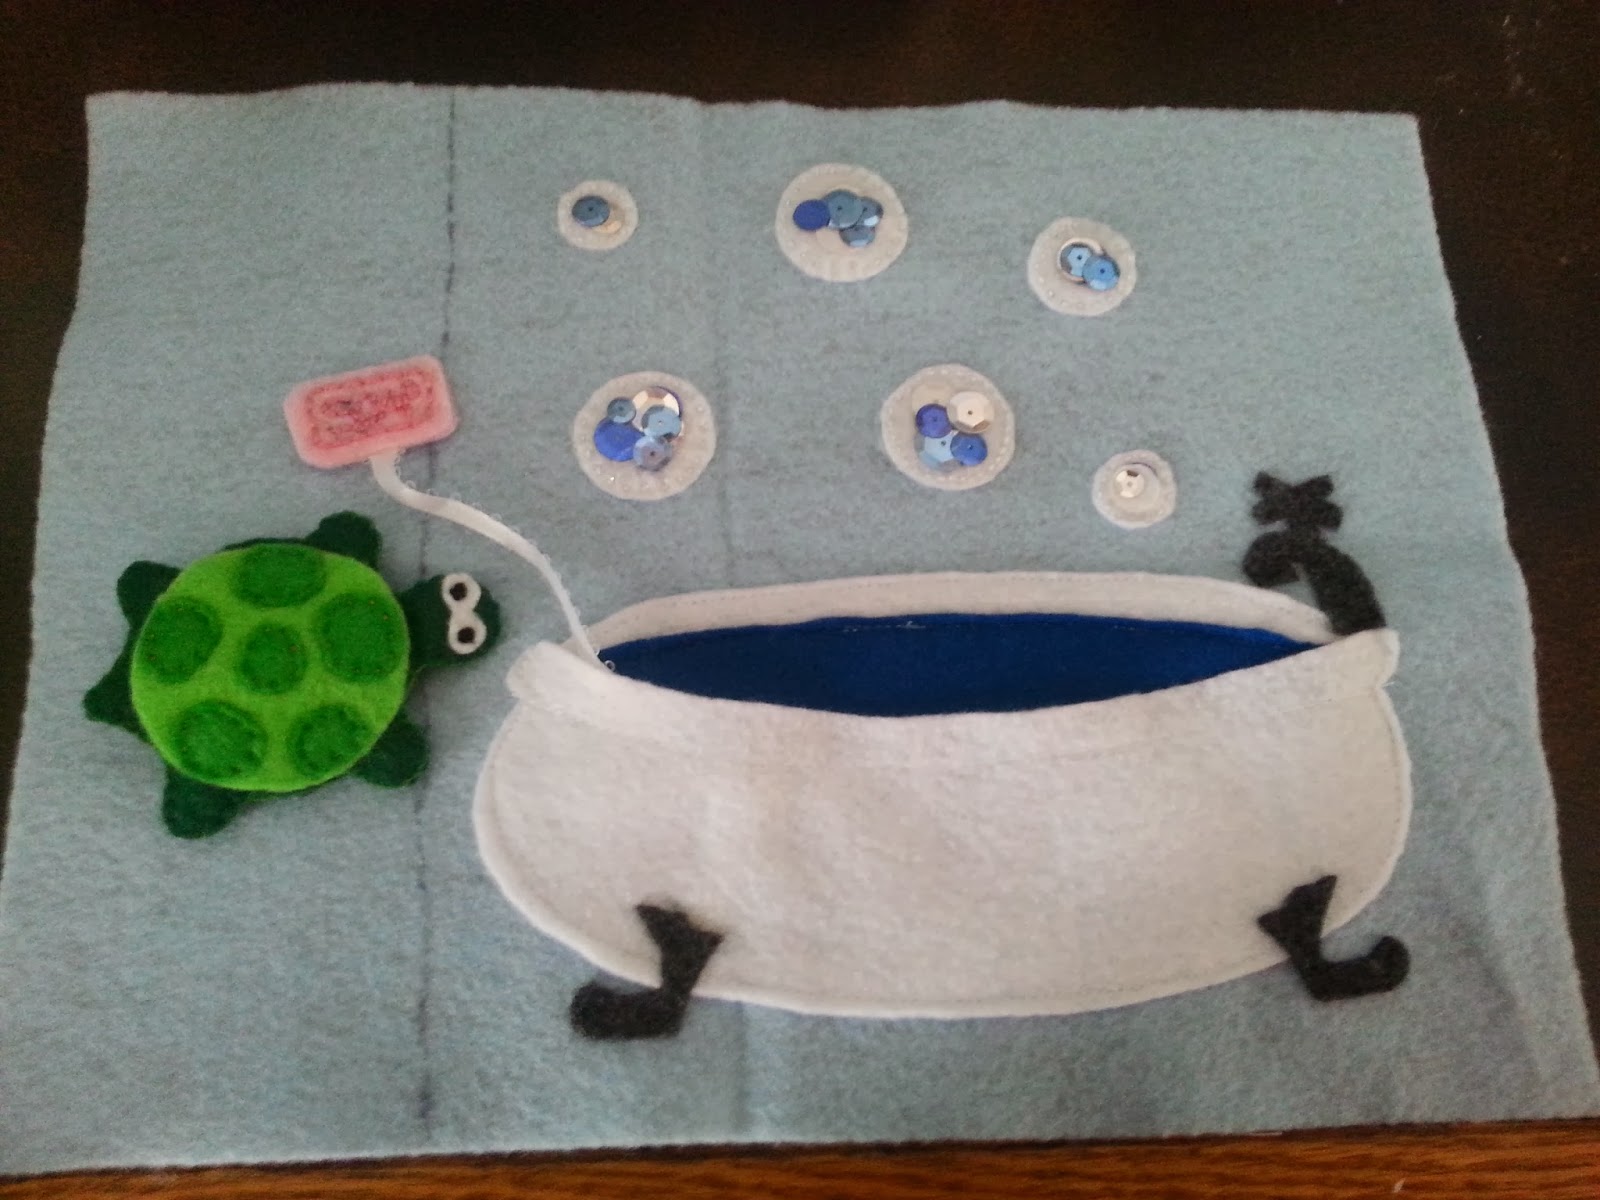
I Had a Little Turtle Quiet Book Page

Here is another fun kid song that I thought would make a good quiet book page.  I REALLY loved putting this one together.

The turtle is a finger puppet in the bathtub pocket.  The soap is attached with a ribbon so it won't get lost.  And there are sequins in the bubbles.  So much fun!

  
I started by arranging all the pieces on the page so I could make sure it all lined up correctly.  Then I stitched a line on the bathtub front piece only to distinguish the tub lip and keep it from stretching too much with play.  I stitched down the tub back and the water piece.  Then you want to make the soap.  I just used pink embroidery floss to stitch the word "soap" and a dashed outline around the front piece and then hot glued the front and back together sandwiching a piece of ribbon between.  Tuck the ribbon under the bottom of the tub and stitch the tub front onto the page.  Don't worry if some ribbon sticks out of the bottom - you can cut it off pretty closely after it's stitched and the tub foot should cover the rest.  I just hot glued on the tub feet and spout.  The bubbles are white backgrounds with sequins sandwiched between vinyl.  I hand stitched around the vinyl with tiny tiny stitches to attach it.


This is the back of the turtle so you can see how I did the puppet part.  Basically, I did the turtle front first and stitched on the green shell and round shell decorations.  I also stitched on little white round eyes with a black french knot in the middle.  Then I put the turtle front and back together and cut the third turtle piece right above and below the legs to create a tunnel for a finger.  Hopefully the picture above helps clarify!  I stitched around the outline of the turtle with a blanket stitch.
This page is pretty simple, and only took me about an hour to complete.  Great naptime project!
As always, if you make it, I would LOVE to see your version.

Saturday, March 8, 2014

A Peanut Sat on a Railroad Track Quiet Book Page


Have you ever heard this kid's song?  It was on the "Wee Sing Silly Songs" cassette tape I used to listen to as a kid.  Except in our version it was "down the line came number nine" which rather works better for a quiet page.
I used the train ornament pattern from Imagine Our Life.  I just left two holes on each end to run the ribbon through so the train stays on the track.  The track rails are very simple: two pieces of thin brown ribbon sewn to each diagonal end of the page.  The track pieces are dark brown (or gray) rectangles that I hot glued on evenly spaced down the diagonal.  I also stitched on a green pocket the same color as the page.

For the peanut, I stitched random black lines to give the look of a shell on the front, plus an "o" shaped mouth and two little white circles attached with black french knots.  Then I stitched the front and back together with a blanket stitch.  I did the same blanket stitch around the front and back of the peanut butter.


Thursday, March 6, 2014

5 Little Monkeys Two Page Spread

I made the Five Little Monkeys Jumping on the Bed Page from Imagine Our Life for my nephew, but he mixes up the song with the Five Little Monkeys Swinging in a Tree so I designed the accompanying page to go along with the monkeys.  I love that the alligator can "snap" the monkeys :)
I didn't draw up the patterns for this yet, but comment and let me know if you would like one and I'll try to get it to you asap.

 
I changed the "mommy called the doctor" to "daddy called the doctor", so daddy monkey is in a Batman shirt and camo shorts.
 
The alligator's teeth are actually diamond shaped that I machine showed on as pictured.  Then I used hot glue to attach the two sides to make them stiffer.  Worked great!

I also hot glued on his googly eyes.  I LOVE how he turned out!

All ready to snap monkeys!


Tuesday, March 26, 2013

Picture Tutorial on Installing a Grommet

I got a comment on my Wheels on the Bus page asking if I could give directions on installing a grommet.  Since I personally am a visual learner I thought I would put up a picture tutorial on how to install a grommet.

Hopefully this makes sense and is easy to follow!  I picked up this package of about 20 grommets and the top and bottom nail piece at my local Joann Fabric store for like three dollars.  Please let me know if you have any questions!

Wednesday, March 6, 2013

Star Wars Zoo Quiet Book with Pattern & Instructions!

So I FINALLY finished my big project I have been working on.  This is the first quiet book that I have designed entirely on my own, so I'm pretty proud of it :)  My youngest just turned one, so he is a little young for it yet, but he still loves playing with it.  His two older brothers and daddy love it too!  Basically, everybody in my family loves it - you just can't go wrong with Star Wars.

The pattern is coming as soon as I can get it typed up and scanned and everything.  We are hosting a birthday party this weekend (Star Wars themed of course) so I hope to work on it this coming week.  For now, enjoy the photos and come back next week for the pattern!
Update - The pattern and instructions are FINALLY finished!  Took me a while to get it all typed up and then a while longer to figure out the whole scanning & putting together part of it.  But now, I offer to you completely FREE my first design: The Star Wars Zoo Quiet Book Pattern & Instructions.


Please let me know if you make this book!  I would LOVE to see pictures of someone else's interpretation of my idea!


I Heart Nap Time

Tuesday, February 5, 2013

How to Make a Felt Quiet Book, part 2

I have two really awesome quiet books in the works right now.  I am hoping to have one of them done by my son's first birthday - coming up on Valentine's Day!  Once it's finished, you can be sure I'll post pictures and such!


Okay, first things first.  In order to sew a quiet book you have to know how to sew.  Of all the skills you will ever learn, sewing is probably one of the most simple.    There are tons of videos and instructions online to teach you how to sew so I won't rehash them here, but here's a link to a thorough and basic tutorial for pretty much everything you'll need for a quiet book: How to Sew   Felt quiet books can be sewn either by hand or machine.  I prefer machine sewing wherever possible because it is much faster for me, but I have friends who prefer to sew by hand so it completely a personal preference.  Another option for putting together a quiet book is a hot glue gun.  This is a very simple, inexpensive, and quick way to make a book.

            Supplies for a quiet book are also fairly basic – unless you get carried away and want to embellish your pages.  Then you can get as wild as you like.  9X12 craft felt sheets are the most common material and can usually be found for about a quarter each.  Amazon sells a very nice large package of felt in multiple colors that will last for several books.  Your local crafting or hobby store probably also carries craft felt both in sheets and sold by the yard.  There is a wide variety in the type of craft felt available such as glitter, stiffened, adhesive, and embossed.

            The main thing to keep in mind about craft felt is that it is not actually wool.  Usually made out of acrylic, polyester, rayon, and/or viscose, it is the cheapest material available for felt quiet books.  If you really want to be environmentally friendly with your quiet book,  there is also felt made out of recycled plastic bottles called Eco-fi or a bamboo/rayon blended felt branded Xotic.  While stiffer than craft felt, either of these choices will work for quiet books.  Both are also more costly than craft felt.   Blended wool felt is another possible felt.  It will last the longest due to its sturdier construction.  However, do keep in mind, it can be more difficult to sew with due to the texture.

            Other supplies you will need include needles, thread (matching your felt is optional), a good pair or two of scissors, and any embellishments you desire.  A few common embellishments include buttons, clear vinyl, snaps, velcro, ribbons, sequins, buckles, etc.  Don't feel like you need to buy a lot of embellishments.  Some of the most unique and interesting pages are made with recycled embellishments.  For example, an old pair of buckles from overalls or clear vinyl from a blanket storage bag.  If you want a page to crinkle, a baby wipes bag or chip bag is the best material I have found to make a loud crinkle and is a nice and cheap option.

Tuesday, January 29, 2013

How to Design & Make a Felt Quiet Book, part 1


      Felt quiet books are exploding all over the internet.  Many blogs are giving tutorials on how to do certain pages, people are posting pictures of their creations, and Pinterest is practically bursting with ideas and examples.  I first learned about quiet books after searching for felt figures for a flannel board for my children.  I thought the whole idea of a washable, soft, and entertaining book was brilliant, especially for my busy toddler boys.  I made two books using a design pattern I purchased off of Etsy and I was hooked. 

     The books turned out beautifully, my children LOVED them, and I felt I had created an heirloom quality piece of art that would last for a long time.  I really wanted to try some girl themed pages, but since I only had boys, it didn't seem very practical until a friend of mine adopted a five year old girl from China.  I made a quiet book for her using different ideas I found on blogs around the internet.

     Now before you get the idea that I am some crafty genius, I will tell you right off that up to this point I was ONLY using other people's patterns and ideas.  I could follow directions, but I didn't feel like I was adding anything special to my books.  There was just something missing.  Then one day I realized what it was: MY ideas.  See, the way I figure it, each person has unique ideas all locked up inside their head.  You may share similar ideas with somebody else, but there is something special that only you can create or add or accomplish.

     Using other people's patterns is wonderful, don't get me wrong.  But that should just be practice.  A starting point to spur on your creativity to making your own personalized, unique books tailored to the child you are sewing for.

     So, with great fear and trembling, I designed my own pattern page based off a song my boys liked to sing.  It wasn't as difficult as I thought.  In fact, it was exhilarating.  I had made something no one else had thought of.  And I am NOT an artistic person.  I can't draw much more than stick figures and forget about “graphic design”.  That is just not me.  I have basic sewing skills and a love of all things crafty.  That's it.  

     Now, why should you care?  Because my goal with this blog series is to give you basic instruction on quiet books and inspire you to design your own.  If you know the basics, you CAN design your own felt pages and books and you CAN turn out amazing felt quiet books with a little time and minimal cost.  And people will be amazed at the things you make  :)

Wednesday, January 16, 2013

Wheels on the Bus Quiet Book Page


One of my favorite pages that I designed was this Wheels on the Bus Quiet Book Page.  The wheels really turn, the doors open, and the children are finger puppets so they can move "up and down".  It seems like every little kid knows this song, so it only made sense to include it in a car themed quiet book.

For this page I used the pattern, felt in blue, dark gray, black, yellow, red, white, light gray, cream, brown, mustard, & three patterned felts for the kids' clothes.  I also used two short lengths of blue ribbon, two grommets, and two 1" black buttons.

I started out by making the kids so my children could play with them while I finished the rest of the page.  They are super simple to make - no sewing required!  (Of course, they could be sewn if you want, but hot glue is MUCH faster, makes them stiffer, and is completely machine wash/dryable).


To assemble the kids, glue any embellishments onto the body front (for the overalls, glue the ends of two short lengths of blue ribbon beneath the overall front) and then glue the body front and back together on the curved U shape only so the bottom will be open for a finger.  (The ribbons get wrapped over the shoulders of the kid, crossed in back, and glued under the overall back).  For the heads, the body gets slightly sandwiched between the head front and back and glued together.  Then I add the hair front and eyes.  Honestly, it's longer to explain than to actually do.  All three kids took me maybe fifteen minutes to put together and you know hot glue dries within minutes so it's very easy to make a whole class worth of kids.

To make the bus I first stitched down the two black stripes.  Then, I stitched down the gray road and figured out the placement of the bus onto the page.  After that I stitched around the outside of the bus to attach it to the page.  I added the bumpers and lights and stitched around the driver's window.  I matched up the inside door pieces to the doors on the bus, tucking the excess under the bus body.  I machine stitched where the doors meet the body of the bus so they open easily and then hand stitched around the other three edges of each door to attach the door front and back together and make them more sturdy.  Finally, I stitched around the upper three edges of the big window, leaving the bottom edge open to make the pocket for the kids.

I cut out the black wheels with pinking shears to give them a cool looking edge and added grommets to the middle.  I stitched the buttons on through the grommets so the wheels can turn.  And that's it.  The whole page comes together fairly quickly and I think it is super cute.

If you make this page, please comment or email me and send me pictures!  I would love to see how yours turns out!


Wednesday, January 9, 2013

Mail Truck Quiet Book Page

Almost every quiet book I've seen includes a mailbox page.  I love the mailbox page that Stephanie did, but thought it should be a two page spread for my nephew's book.  So I created a mail truck to go along with the mailbox page and deliver the mail and packages.


For the mail truck page I used: the pattern, felt in light blue, dark gray, black, red, blue, and white, two buttons, two grommets, and iron on transfer paper.
I started by sewing down the red and blue stripe.  Since the door is cut in the truck shape, the stripes are two separate pieces for each color.  This actually makes it much easier to make sure they are the correct length for the truck. 
After that, I ironed on the logo and web address to the truck body.  This really makes it look like a mail truck with not a lot of effort.  Don't iron over the red and blue stripe though!  I did and they bled a little bit :(  Yours will look much better cause I already made that mistake for you.  You're welcome :)
Then I placed the truck on the page and stitched around the outside edge to attach it to the page.  I also stitched around the windshield area.  I added the gray road and stitched on the turn signal and bumpers.  Then I put the grommets in the wheels and attached them to the page with buttons through the grommets so the wheels can turn.

I hand stitched the blue window to the front of the door and added the white door back piece for stability.
 Then it was on to the packages!  I basically stitched together a box like shape with a cut opening so you could see what was in the package.  I stitched a shaped button in each package and they were complete.


This is a VERY fun page to play with, especially when you combine it with a mailbox page.  It didn't take me very long to put together (one nap time), but it is a very interactive and cool page.  Please comment or send me pictures if you make it!  Enjoy!