Friday, December 28, 2012

Transportation Counting Quiet Book Page

For Christmas I made my nephew a car themed quiet book.  He is two and REALLY into cars right now.  I designed a transportation counting page to go into the book and thought someone out there in the great big internet might be interested in a tutorial on how to make their own.


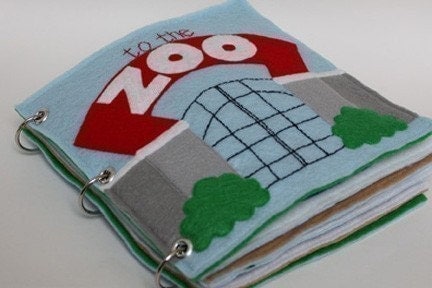
I used the pattern, felt in blue, green, white, gray, yellow, brown, red, light blue, and dark gray.  I used one full piece of felt for the background and scraps for the rest.  The page measures 9x9.  The extra blue on the right side is to put holes for rings to make the book.  One of the things I love about felt is the ability to use every little bit for all kinds of projects!  I also used ribbon (I had blue on hand so that's what I used), these beads, and embroidery floss in white, blue, and black.

I started by stringing the beads on the ribbon and laying out the page so I could get a general sense of where everything would go.  This helped me know how long to cut the various ribbons too.
Then I stitched the yellow lines on the road and the waves on the lake.  After that I sewed down the 9x5" green ground, road, lake, and railroad tracks.  If you would rather, they could also be hot glued onto the page, just leave a space at the edges so you can sew down the ribbons and ribbon coverings cause it is practically impossible to sew through hot glue :p

After the background was finished, I machine zigzagged the ends of the ribbons to the page.  Since this was for a two-year-old, I made sure those ribbons are never coming off!


To make the page look nicer after that, I embroidered the stop sign and railroad crossing sign, tucked the end of the sign posts underneath, and stitched them over the ribbon ends.  I also stitched down the yield sign, the dock to cover the boat ribbon end, blue ribbon cover for the other side of the lake, gray ribbon cover on the end of the railroad track, and two clouds for the airplane ribbon ends.

As you can see, it's not a perfect sewing job, but once you finish you can always trim the edges of the page to make it look nicer.


That's it!  If you make this page, please send me pictures so I can see what amazing creation you make!

Thursday, August 2, 2012

Mailbox Page


This is Stephanie's Mailbox Page.  I used patterned felt for all the envelopes and came up with a GREAT way to personalize the letters.  I collected pictures and notes that I flipped horizontally in Microsoft Paint so they were backwards, printed them out onto iron on transfer paper, and ironed them onto cream colored felt.


These are the five letters I made.


My boys love mail so this is a great page for them.

Tuesday, July 31, 2012

Dinosaur Quiet Page


Another one of Stephanie patterns I made.  I added the volcano to the page and opted not to make faces on the dinosaurs.  I decided after doing this page that ribbon is a lot trickier to sew down than it looks!


Saturday, July 28, 2012

I Spy

This is the boy themed I Spy page I made using 3 different button packs from Shelly's Buttons.  I used the "superhero", "boy's toys", and "when he grows up" packs.  I also used a bag of white poly beads from JoAnns, red felt, clear vinyl, and white ribbon.  I laminated my list using my awesome $20 laminator from Costco (such a useful tool!), punched a hole in it and threaded the ribbon through the hole.  Then I sewed the ribbon back to itself to attach it to the list.  The page is actually really quick and easy to do.  I used my sewing machine for the whole thing to make it even faster.  The only problem I really had was that the vinyl MUST be between two layers of felt because it sticks to the sewing machine and won't move like fabric.

Since my pages are 9x9 I cut a red front piece and freehanded a hole in the front.  I cut a square slightly bigger than my hole and layered vinyl in between and sewed around the circle.  Then I cut the same sized hole out of the square - being VERY careful not to cut the vinyl.  I decided I wanted the beads to show through the vinyl better and be easier to find so I sewed the back 9x12 piece to the sides and bottom of the 9x9 piece and then stitched the sides and bottom about two inches outside of my vinyl window.  This creates a pocket you can dump your poly beads and buttons into.

Then I simply sewed the top of the circle closed and the top of the page to the background.  Stitch the ribbon to the inside edge of the page and it's done.  It is so much fun to shake the page around and find the buttons inside!

Monday, July 23, 2012

Change the Face Quiet Book Page


This was a quick and easy page spread that I made.  I freehand cut out a face shape and stitched it to the left  page.  Then I cut and stitched a pocket with star patterned felt on the right page.  I added a flap to the top of the pocket.  This would allow you to add velcro or snaps to close the pocket if you wished.

I got pictures and clip art of eyes, noses, and mouths off google images, arranged them on a page and printed them onto iron on transfer paper.  I ironed it onto white felt, cut them out and put them into the pocket.

Simple + Fast + Fun to play with = Awesome quiet book page!


Wednesday, July 18, 2012

Space Ship and Aliens Page


This is the latest page I came up with after seeing a similar one on Pinterest.  There was no pattern so I made up my own.  
The one special element of this page was the buttons.  I used the Take Me To Your Leader set from Shelly's Buttons and More.  I LOVE her site and variety of buttons.  I have to give myself a strict budget when I shop from them though cause there are just SO MANY cool button packs and I keep thinking of new fun pages to use them for.


I used dark blue felt for the background, gray for the ground, white & blue for the rocket ship, tie dye purple & lavender for the planet, and red, yellow, and orange for the flames.  Oh, and lime green and black scraps for the alien finger puppets.  I also used the buttons, googly eyes, scraps of decorative trim, a couple sequins, and clear vinyl for the rocket window.

I started with the planet.  I machine stitched around the outside of the planet and both edges of the ring, then I did another accent line in the middle of the ring.  Hopefully the close up picture explains what I mean: 

After I finished the planet I stitched the ground on.  Then I positioned the bottom rocket piece and stitched it into place - leaving room on the page for the flames.  I really enjoyed making the flames!  I layered the yellow, orange, and red shapes and stitched around the edge of the yellow to attach them to the rocket.  I overlapped them with the bottom of the rocket since the top rocket piece will cover it.  I then free form did a flame outline with my machine.  I think it makes the flame look much cooler!


I hand stitched the accent pieces onto the top rocket piece.  Then I sandwiched the vinyl between the top rocket piece and the middle ring piece - otherwise the vinyl sticks to my machine and snarls it all up - and stitched around it.  I left the top edge of the rocket open to form a pocket for the aliens.

I made the aliens with my hot glue gun.  Hot glue works beautifully with felt and is secure enough for rough playing.    I wouldn't use it for children who put things in their mouth though.  My five year old designed the eyes and mouth for the aliens for me :)  I glued the eyes, mouth, decorative trim "belts", and sequin "communicators" to the top body piece and glued top and bottom piece together around the edges.
My boys LOVE this page!

Monday, July 16, 2012

Circus Train

This is another of Stephanie's patterns that I made.  I LOVE finger puppets and I thought the idea of a circus train was very clever.

Thursday, July 12, 2012

Let's Make Cupcakes


I JUST finished the cupcake page from Stephanie.  She has the cutest pages!  I am working my tail off trying to get 16 pages done for 2 quiet books for my 2 NEW NEPHEWS!!!  My brother-in-law and his family are adopting two sweet little boys from Haiti.  They are 7 and 3 years old.  We are SO excited to meet them and my boys are so looking forward to getting to know their new cousins.
Quiet books are the perfect gift for them because they will be useful on the airplane, doctor's visits, church, etc.  I am hoping they love the books.  MY boys sure love this page.  I'm going to have to make another one for them since they are currently standing next to me playing with it :)

Farmer's Market

I made this beautiful pattern from Stephanie at Imagine Our Life.
I made a couple small changes, mostly cause I am not nearly as good at fitting stuff on a page as she is.
Isn't it lovely?
She is an amazing designer and seamstress and I am always impressed at her patterns and how she so sweetly offers them for free!


Monday, July 9, 2012

5 Little Monkeys Jumping on the Bed

This is one of my recently finished pages.  I wanted to make a page to go with the song 5 Little Monkeys Jumping on the Bed.  Since I've taken this picture I added fabric paint eyes to the little monkeys.
I used purple, green, black, blue, white, brown, tan,gray, and pink felt.  I also used purple ribbon, black and white embroidery thread, 2 buttons, a sew on snap, and silver ball cord.
I made all the little monkeys first.  I stitched the faces onto the heads and then sandwiched the arms and legs and ribbon between the bodies and the body between the head pieces.  The fun part is that you can pose the monkey however you want when stitching them for a lot of variety.  Then I stitched the ribbons down to the page and positioned the bed over them.  I did the bed supports first, followed by the blanket and finally the pillow.  I stuffed the pillow with a tiny bit of stuffing to make it fluffier.

For the facing page, I simply stitched the faces to the heads and then the heads to the page; adding the stethoscope with black embroidery thread and a button.  I stitched the phone base to the page and added the embroidered black circle with a button so it can turn.  The phone was stitched mostly together, turned right side out, stuffed, and attached to the phone base with the silver ball cord.  Finally I added a snap beneath the phone to hold it to the page.

As always, if you are interested in the pattern, please email me and I will send it to you.  One of these days I will learn how to attach a document on blogger.
Update: HERE IS THE PATTERN :)

Friday, July 6, 2012

Bragging on my mom and sister

My mom and little sister are amazing.  Check out what they did to my little brothers' room to give it a Lego theme!

My mom hot glued duplos to a posterboard frame & put cut out Lego guys with my brother's names in them


 This is my incredibly talented and awesome sister painting Lego Ninjago heads on the wall.  They are HUGE and amazing.  I never noticed Kai had a scar until I saw his head all big like this.  Or that their eyebrows are all different.  They are pretty detailed little Lego guys.


 She also painted the Lego & Ninjago logos on another wall and this picture above the light switch that my brother drew and designed :)


Tuesday, June 26, 2012

Hobby Lobby

My favorite place to buy felt is Hobby Lobby.  I've never actually been to the store because it's prohibitively far from me, but their online site is very easy to use and navigate.  Just look at the variety of felt they have!  This is my stash of felt I currently have.  I was cleaning my room and decided to show you :)

Craft felt is so inexpensive and versatile.  It is my very favorite craft supply to have on hand for things.  While quiet books are my biggest use of felt, I also have made beanie babies, decorated t-shirts, and made felt food.

Thursday, June 21, 2012

Father's Day Idea

I saw this awesome idea on Pinterest that I thought was just perfect for my father-in-law.  My boys call him PopPop.  He is diabetic so I tailored the items going into the cans to be sugar free/low carb.

 before

& after


Tuesday, June 19, 2012

Quiet Book Patterns

Copycrafts is an etsy shop that is run by John & Jennifer.  I came across their patterns on etsy and it was the first quiet book I had ever attempted.  I made the Under the Sea book and the To the Zoo book.  Both are adorable and my two (at the time) toddlers loved them.
I would recommend their books for younger children simply because there is not as many "moving parts" to their books that would keep an older child entertained.  For kids less than three years old, these books are perfect to stick in a diaper bag to take to the doctor's office, in the car, and anywhere you need a little one to  sit quietly.

I am working on several new quiet book pages that I hope to blog about in the next few days.  Hit a small snag last night - my computer totally died on me :(  Thankfully, I have it totally backed up so life goes on!

Update: here are some links to some of the quiet book patterns that I have designed and offer to you for free!
5 Green & Speckled Frog Page
Frog Life Cycle Page
Alien and Spaceship Page
5 Little Monkeys Jumping on the Bed Page
Transportation Themed Counting Page
Mail Truck Page
Wheels on the Bus Page


Wednesday, June 13, 2012

Frog Life Cycle Felt Page


To go with my frog song page and to be more educational I designed and made the life cycle of a frog.  The little frog/tadpole is called a metamorph.  Did you know that?  I think that is a super cool name - metamorph.  Kind of sounds like an X-men or something :)

I used blue, 2 colors of green, 2 colors of light green, brown, and tan felt.  I also used black, green, and blue embroidery thread, white sequins, & sew on googly eyes.  I really like all the textures on this page.  For the background I used blue felt and machine stitched a horizon line about 3 inches from the top.  I then lined up the lily pad and sewed it down.  I embroidered green vine lines down from the lily pad and added leaves.  Then I arranged the sequins and attached them with a black french knot to resemble frog eggs.

The tadpole is only stitched around the brown part.  I sandwiched the tan tail beneath the brown while I was sewing but did not stitch the edges of it so it has some movement.  I did the same for the metamorph, sandwiching the tail and arms and legs beneath the body while I stitched it.  I then stitched around the arms and legs.
I did the cattails next by stitching down the grass and then adding black embroidery for the stalks.  I stitched down the flowers (did you know the brown cyclinder part is a flower?) and added blue embroidery for the water.
Then I stitched down the frog's body and added his legs and arms.  Finally, I sewed on all the eyes.  I finished the back of the page like I did the 5 green and speckled frogs page with frog themed material on the back and topstitching around.  In retrospect, I should have positioned the page elements further in towards the middle so I had more space around the outside.  I'll have to remember that for future pages - leave bigger page margins!
If you are interested in making the page, please email me and I will send you the pattern.  Update - Here is the pattern.

Monday, June 11, 2012

Five Green & Speckled Frogs Quiet Book Page


I love felt quiet books.  They are such fun for little hands and they make such personal and great gifts!
This is the first page I have ever designed on my own.  My kids love the song Five Green and Speckled Frogs
so I wanted to make a page on which they could move the frogs while they sang the song.

I used black, brown, light blue, blue, light green, green, and white felt for this page.  I also used black & blue embroidery thread, blue ribbon, and frog themed material to back the page.  The page is 9x9.  I find this is the best size for me cause it fits nicely in small hands.

First I embroidered waves on the blue pond shape and zig zagged the top edge of the pond and set it aside.  If you are worried about stretching you could use stiffened felt instead.  Next, I sewed random wavy lines and knots onto the log shape to make it look like wood grain.  Then I positioned and sewed the log to the page.  Then I put together the frogs.  I first attached the eyes to the frog body with french knots and then used the same black embroidery thread to attach the frog belly and make the mouth.  After that I sandwiched the arms and legs between the frog top and bottom body and sewed around the edge, leaving a space at the top and bottom for the ribbon.  I used a safety pin attached to the ribbon to thread the ribbon through the frog openings.  Don't forget to measure the ribbon to the length that will fit from about an inch over the top of the page to a length that will be covered by the pond.

I sewed down all the bottom edges of the ribbon and pinned the top edges.  Then I sewed the pond pocket on.  I positioned and sew down the middle of all the black "flies".  They kind of looked more like butterflies to me but all well.  I put the right sides of the felt page and frog themed material together and starting on the side of the page sewed around the outside, leaving a section open to turn it right side out.  I sewed a couple of times across the ribbon top edges since I have boys that will pull on the ribbon.  Then, after I turned the page right side out I topstitched around the edge, making sure to close up the hole I used to turn the page right side out.  This gave it a nice finished look.

If you are at all interested in the pattern, please email me and I will email it to you.
Update: HERE IS THE PATTERN :)

Monday, May 21, 2012

Dr. Seuss Baby Shower

My Mom, Sister, & I threw a baby shower this past weekend for a friend of ours.  We decided on a Dr. Seuss theme.  With a little inspirational help from the oh-so-awesome Pinterest this is the result:

 My gift - blanket & crib sheet I made

I also did the onesies :)  I loved the bulletin board cutouts & the goldfish.

Found this memory game at Target - PERFECT for decorations & my boys love it.


 Made the new mommy a maternity shirt I found at Joanns

 More decorations


 Fish in a pot :)


 Aren't the truffula trees amazing?


 Close up of the onesies - I used this generator to make the image, flipped it horizontally in my computer's Paint program, printed it onto iron on transfer paper, and ironed it on.  Simple, yet so cute!

 Downloaded a Suess font for these.

 My favorite one


 Peach juice with mango chunks.  Lorax pumpkin carving template from the Lorax website :)

I was SO proud of how it all turned out.  Just goes to show that Pinterest can be really useful!